
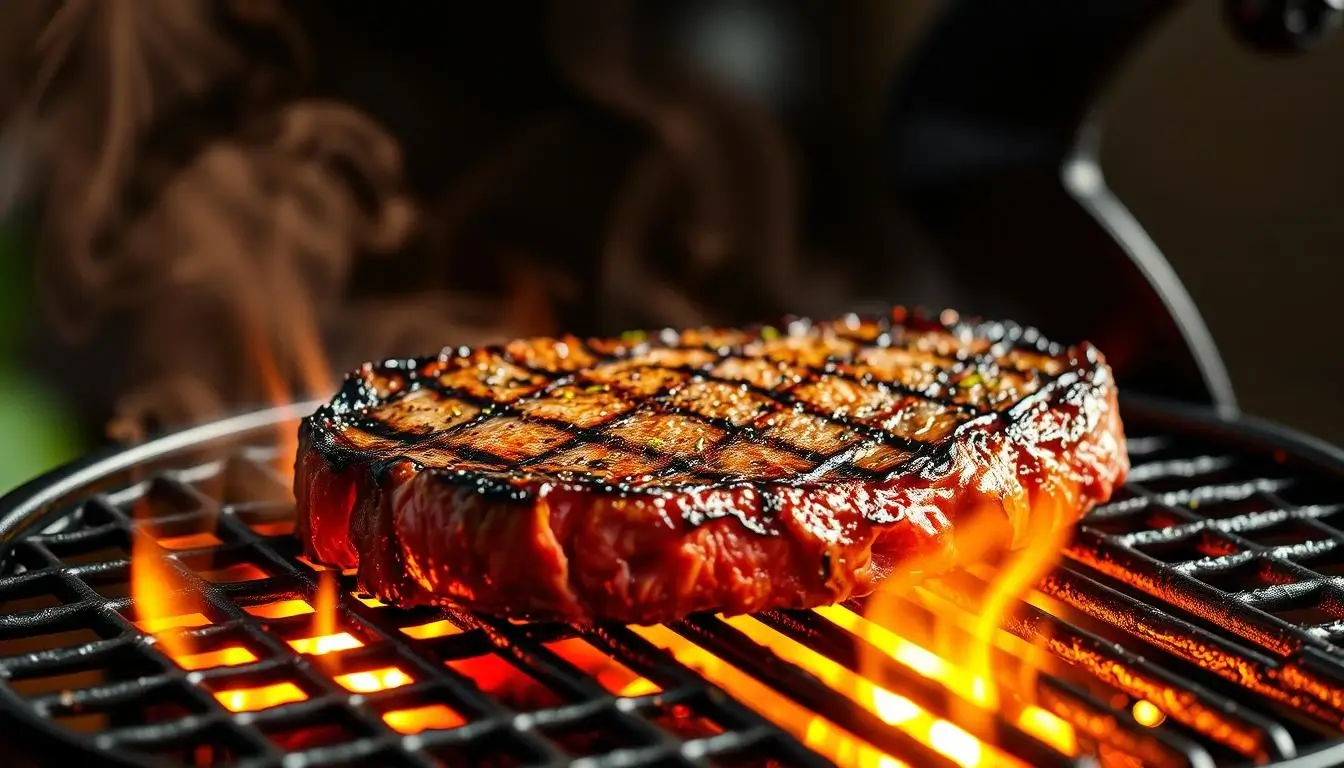
Want to make steak as good as your favorite steakhouse? This guide shows you how to grill like a pro. Learn how to sear ribeye and perfect marinades. A few key techniques can make all the difference.
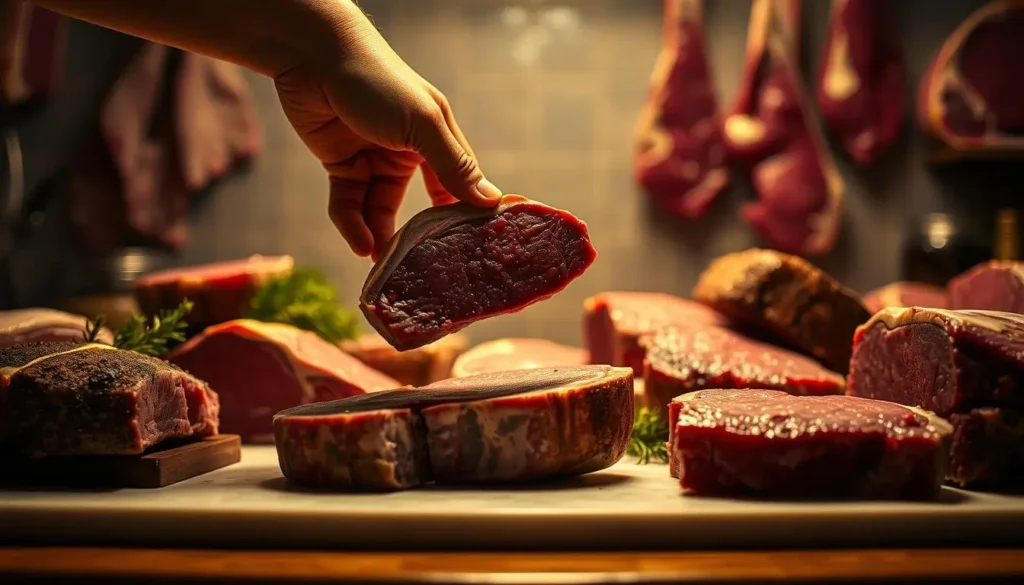
First, pick the right cut. Look for marbling, thin streaks of fat, to keep it tender. A homemade rub with garlic, pepper, and smoked paprika adds flavor without overpowering. Always pat your steak dry before seasoning for a better crust.
Two heat zones on your grill are essential. Sear over high heat to lock in juices, then cook over indirect heat for even cooking. Basting with herb butter during the last minutes adds richness and keeps it moist.
Follow our step-by-step guide to avoid common mistakes. From preheating your grill to resting meat properly, every detail counts. Serve with fresh sides like a crisp onion salad or roasted vegetables for a balanced meal.
Key Takeaways
- Homemade seasoning blends enhance flavor better than store-bought mixes
- Two-zone grilling prevents overcooking and ensures perfect doneness
- Compound herb butter adds restaurant-quality richness to steaks
- Quality ingredients like fresh garlic and coarse pepper elevate results
- Resting meat for 5–7 minutes after cooking preserves juiciness
Introduction to Grilled Beef and Grill Techniques
The secret to succulent steak is balancing heat, fresh spices, and timing. Whether you’re working with ribeye or sirloin, mastering these basics turns ordinary cuts into amazing meals.
Direct searing versus indirect cooking is what separates amateurs from pros. Sear your steak over high flames for a caramelized crust, then move it to a cooler zone for gentle finishing. This method prevents overcooking and keeps juices in.
Your pantry has everything you need for bold marinades. Mix olive oil, minced garlic, and chili pepper flakes for a base that tenderizes meat. For depth, add smoked paprika or crushed red pepper. “Freshly ground spices release oils that pre-packaged powders can’t match,” says award-winning pitmaster Jason Smith.
Timing is as important as temperature. Marinate thicker cuts for 30–45 minutes to let flavors penetrate. Use a mortar and pestle to crush whole peppercorns and dried herbs—this creates texture that clings better to meat surfaces.
Consider these contrasts:
- Chili pepper adds heat, while red pepper offers subtle sweetness
- Coarse salt enhances crust formation vs. fine salt dissolving quickly
- Quick 10-minute marinades work for thin cuts vs. longer soaks for tough meats
You’ll learn both basic and advanced techniques in the following sections. Clear instructions ensure success whether you’re grilling your first steak or fiftieth.
Selecting and Preparing Your Beef Cut
Optimal preparation starts with understanding what makes certain cuts shine on the grill. Ribeyes have rich marbling that melts during cooking, while tenderloins offer lean tenderness. Look for bright red meat with creamy white fat streaks—signs of quality and flavor potential.
Trim excess fat strategically to prevent flare-ups without sacrificing juiciness. Grill master Steven Raichlen advises:
“Leave a ¼-inch fat cap on ribeyes for self-basting, but remove silverskin from tenderloins that won’t render down.”
Steven Raichlen
Pat steaks dry with paper towels before seasoning. This simple step creates better surface contact for that coveted crust. Lightly brush with high-smoke-point oil like avocado to help spices adhere and promote even browning.
Consider thickness when prepping:
- 1.5-inch cuts develop ideal crust-to-juice ratios
- Thinner slices work for quick weeknight meals
- Uniform sizing ensures consistent doneness
Your chosen cut determines seasoning approaches. We’ll explore how to enhance natural flavors through rubs and marinades next.
Crafting the Perfect Steak Seasoning
What makes a steak unforgettable? It’s your spice blend. Freshly ground seasonings offer flavors that pre-mixed powders can’t. Homemade blends let you control salt levels and mix textures that stick to meat.
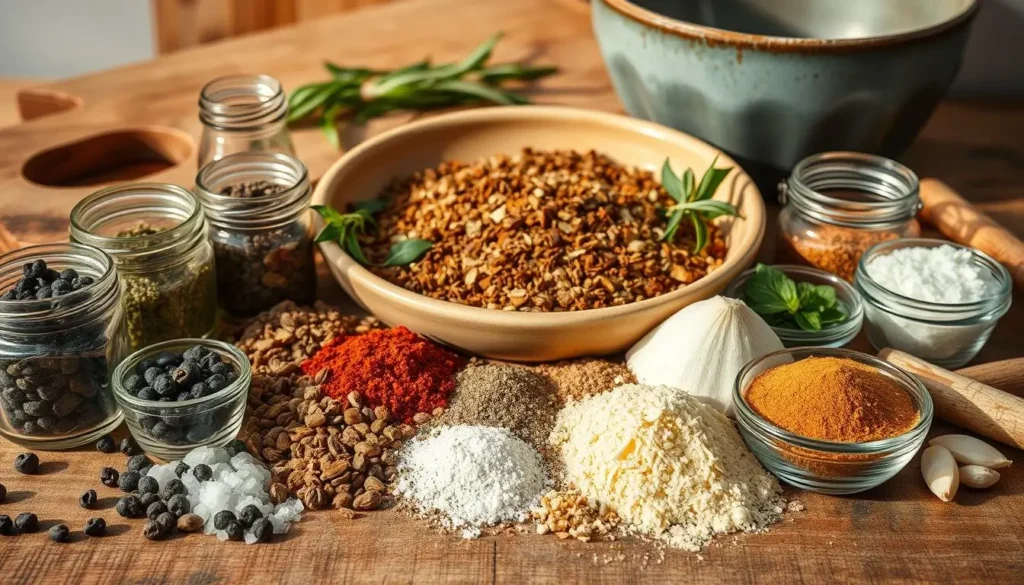
Homemade Seasoning Mix
Begin with 2 tablespoons rock salt and 1 tablespoon black peppercorns. Add 1 teaspoon each of dried garlic, onion powder, and red chili pepper flakes. For smoky depth, include ½ teaspoon smoked paprika. Mix well before grinding.
Chef Emily Wilson explains:
“Whole spices retain essential oils that evaporate in pre-ground versions. Crushing them just before cooking maximizes aroma.”
Emily Wilson
Using a Mortar and Pestle
First, toast peppercorns and chili flakes in a dry pan for 30 seconds. Cool slightly, then add to your mortar. Crush with firm, circular motions until you achieve coarse grains—about 2 minutes. Mix with remaining ingredients in a small bowl.
No mortar? Use a heavy-duty ziplock bag and rolling pin. Lay the bag flat and roll over spices until crushed. This method creates uneven textures that stick better to meat than fine powders.
For even coating:
- Pat steak dry with paper towels first
- Rub 1 teaspoon oil per 8 oz cut
- Apply seasoning mix within 10 minutes of grinding
Store extra blend in an airtight container for up to 2 weeks. Double batches save time while keeping flavors fresh for multiple cookouts.
The Art of Marinating Your Grilled Beef
Marinating isn’t just soaking—it’s a flavor infusion technique. A balanced mix of acidic and savory elements breaks down muscle fibers while adding complexity. Start with lemon juice or vinegar to tenderize, then build layers with ingredients like Worcestershire sauce, minced garlic, and cracked black pepper.
Timing determines results. Thin cuts need 30 minutes to absorb flavors, while thicker slabs benefit from overnight baths. Always use a glass bowl or resealable bag—metal containers can react with acidic components. Pat meat dry before grilling to prevent steaming instead of searing.
| Marinade Type | Key Ingredients | Optimal Time |
|---|---|---|
| Acidic Base | Lemon juice, olive oil, garlic | 30 min – 2 hrs |
| Enzymatic Blend | Pineapple, ginger, chili flakes | 1–4 hrs |
| Dairy Tenderizer | Yogurt, cumin, onion powder | 6–8 hrs |
Your homemade seasoning from earlier pairs perfectly with marinades. Add smoked paprika to echo rub flavors or chili powder for heat. For safety, never reuse liquid that touched raw meat—mix fresh batches for basting.
Test doneness by pressing the surface. Marinated cuts should feel slightly firm with visible caramelization. Let rest 5 minutes before slicing to redistribute juices evenly.
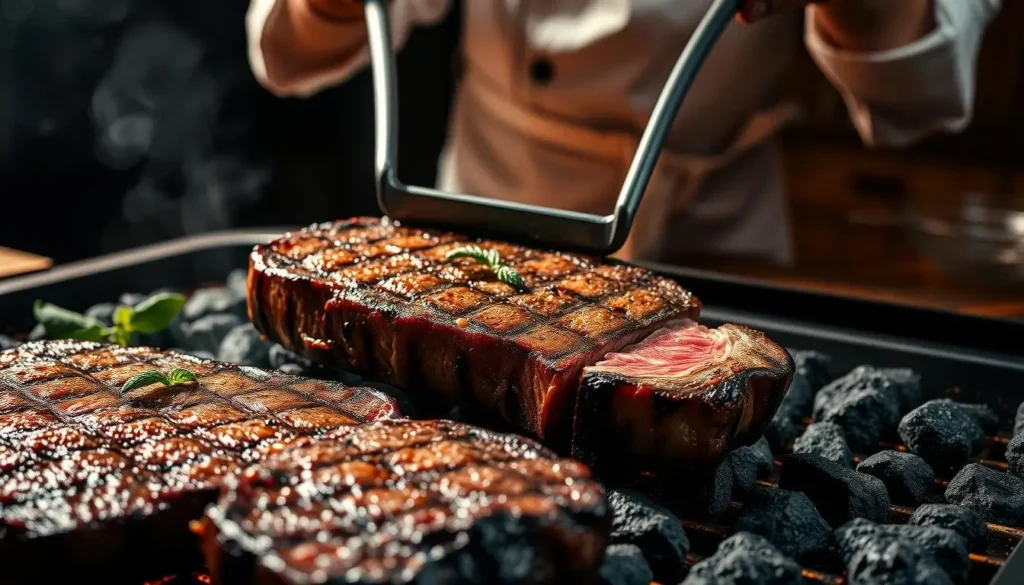
Creating Two Heat Zones on Your Grill
Mastering temperature control transforms good grilling into greatness. Professional chefs and pitmasters swear by dual-zone setups—your key to achieving crusty exteriors and juicy interiors simultaneously.
Direct Searing vs. Indirect Cooking
Direct searing means cooking directly over flames or coals. This method creates caramelization in 2-3 minutes per side. Indirect cooking uses reflected heat for gentle finishing—perfect for thicker cuts needing gradual doneness.
Follow these steps to set up zones:
- Preheat your grill 15 minutes before cooking
- For gas: Turn one burner to high, others to medium-low
- For charcoal: Pile coals on one side, leave the other empty
- Test heat by holding your hand 5″ above grates—2 seconds = hot, 5 seconds = medium
Mastering the Art of Two-Zone Cooking
Two-zone cooking is key to grilling success. It helps manage heat and prevents flare-ups. This method is perfect for achieving even doneness.
For gas grills, use the direct zone for high heat and the indirect zone for lower heat. Charcoal grills work the same way, with the direct zone reaching higher temperatures.
Bobby Flay suggests keeping the lid closed during indirect cooking. This helps maintain temperature and prevents temperature drops.
Before searing, lightly oil the grates to prevent sticking. Once the crust forms, move the meat to the cooler zone. Covering with foil during resting helps retain heat and juices.
Two-zone cooking ensures even doneness. It also helps manage flare-ups and works well with different meat thicknesses. Try it with chili-rubbed or garlic-marinated cuts for great results.
Achieving the Ideal Doneness: Temperature and Timing
Getting the perfect steak is all about precision. Knowing when to remove the meat and how to finish it makes a big difference. Let’s explore the science behind perfect doneness.
Understanding Steak Temperatures
Internal temperature is more important than color or texture. Use a digital meat thermometer for accurate readings. Insert it into the thickest part, avoiding bones or fat pockets.
| Doneness | Temperature (°F) | Resting Time |
|---|---|---|
| Rare | 120–125 | 5 minutes |
| Medium Rare | 130–135 | 6–7 minutes |
| Medium | 140–145 | 7–8 minutes |
| Well Done | 160+ | 8–10 minutes |
The USDA recommends cooking to 145°F for safety. Many chefs prefer 130–135°F for premium cuts. Letting meat rest allows juices to redistribute evenly.
Resting and Basting Techniques
Never skip the resting phase. Place your steak on a warm plate and tent loosely with foil. This 5–8 minute pause lets fibers relax, locking in moisture.
Baste during the last 2 minutes of cooking. Melt herb butter in a small bowl, then spoon it over the surface repeatedly. Hot fat carries flavors deeper while creating a glossy finish.
- Cook to 5°F below target temperature
- Transfer to resting plate
- Baste every 30 seconds for 2 minutes
- Let rest undisturbed before slicing
Pair your perfectly cooked steak with fresh sides like garlic-roasted vegetables or a light onion salad. Timing each step ensures every bite meets your expectations.
Incorporating Flavor: Herb Butter and Marinade Variations
Elevate your next cookout with compound butter. This versatile ingredient adds restaurant-quality richness to simple dishes. Combining fresh herbs with aromatic spices creates layers of flavor that enhance natural juices without overpowering them.
Crafting Flavor-Packed Compound Butter
Start with softened unsalted butter for easy mixing. In a small bowl, combine ½ cup butter with 1 minced garlic clove, 1 tablespoon chopped parsley, and ½ teaspoon onion powder. Add ¼ teaspoon chili pepper flakes for subtle heat. Mix until fully blended.
| Ingredient | Measurement | Purpose |
|---|---|---|
| Unsalted Butter | ½ cup | Base for flavor infusion |
| Fresh Parsley | 1 tbsp | Bright herbal notes |
| Garlic | 1 clove | Savory depth |
| Chili Flakes | ¼ tsp | Controlled heat |
Shape the mixture into a log using parchment paper. Chill for 30 minutes to firm the fat for precise slicing. Chef Marcus Samuelsson recommends:
“Apply compound butter during the last two minutes of cooking. The heat releases essential oils in the herbs, creating an instant sauce.”
Marcus Samuelsson
Use this butter for basting or finishing. Melt a tablespoon over resting meat to amplify juiciness. Pair with citrus-based marinades featuring lemon zest and olive oil for balanced acidity.
Time your preparation wisely. Make the butter while your grill preheats, ensuring it’s ready when needed. Store extra portions in the freezer for up to three months—wrap tightly in foil to prevent odor absorption.
Grilled Beef: Recipe Variations for Different Cuts and Styles
Transform your backyard cookouts with creative twists tailored to specific cuts. Whether you’re skewering sirloin or wrapping tenderloin in bacon, small adjustments unlock new flavor dimensions. Let’s explore how to adapt techniques for diverse textures and tastes.
Kabobs shine with quick-cooking cuts. Cube sirloin steak into 1-inch pieces and alternate them with bacon strips, onion wedges, and bell peppers on skewers. Brush with olive oil mixed with chili flakes for a smoky-sweet balance. Grill over direct heat for 2-3 minutes per side—perfect for weeknights.
| Cut | Thickness | Cooking Time |
|---|---|---|
| Top Sirloin | 1 inch | 4–6 minutes |
| Beef Tenderloin | 1.5 inches | 8–10 minutes |
| Ribeye | 2 inches | 12–14 minutes |
Bacon adds moisture to leaner cuts. Wrap thin slices around beef tenderloin medallions, securing with toothpicks. Grill over indirect heat until the bacon crisps—about 7 minutes. Chef Michael Symon notes: “Fat from bacon bastes the meat naturally, creating self-contained flavor pockets.”
Adjust marinades to match your protein. For kabobs, use citrus-based blends with lemon juice and garlic. For bacon-wrapped cuts, try brown sugar and smoked paprika rubs. Always pat meat dry before grilling to ensure proper searing.
Personalize your approach. Swap vegetables based on season—zucchini in summer, mushrooms in fall. Reduce chili flakes for milder palates or add extra pepper for heat lovers. Consistent flipping and temperature checks guarantee juicy results every time.
Side Dishes and Complementary Flavors for Your Steak
A perfectly cooked steak deserves accompaniments that elevate every bite. Light, vibrant sides cut through rich flavors while adding texture and color to your plate. Let’s explore combinations that turn backyard meals into balanced culinary experiences.
Pairing with Vegetables and Fresh Salads
Crunchy salads and charred vegetables create contrast with savory mains. Try a zesty cucumber salad with red onion and dill—tossed in olive oil and lemon juice. This 10-minute dish refreshes the palate between bites.
| Side Dish | Key Ingredients | Prep Time |
|---|---|---|
| Grilled Corn | Butter, chili powder, lime | 15 minutes |
| Summer Succotash | Corn, lima beans, bell pepper | 20 minutes |
| Kale Caesar | Kale, parmesan, garlic croutons | 12 minutes |
For quick vegetable sides, slice zucchini and toss with olive oil. Grill over medium heat for 4 minutes per side. Sprinkle with cracked black pepper before serving.
Balance bold spices with cooling elements. A yogurt-based tzatziki complements garlic-rubbed meats. Mix grated cucumber, minced garlic, and fresh mint in a bowl. Chill for 30 minutes to blend flavors.
Plan your menu with color variety. Bright cherry tomatoes, charred asparagus, and golden potatoes create visual appeal. These combinations ensure every element enhances the main dish without overpowering it.
Conclusion
Mastering the grill transforms simple ingredients into culinary masterpieces. Your journey to steak perfection hinges on three pillars: bold seasoning blends, thoughtful marinating, and precise heat control. Fresh garlic, coarse pepper, and smoked paprika create flavor foundations, while dual-zone cooking ensures caramelized crusts without sacrificing tenderness.
Every step matters—from patting meat dry for optimal searing to letting it rest before slicing. Detailed directions remove guesswork, letting you focus on balancing science (thermometer checks) with art (herb butter finishes). Experiment with chili flakes for heat or bacon wraps for smoky richness. Personal touches turn recipes into signature dishes.
Revisit the marinade charts and temperature guides whenever you face challenges. With practice, you’ll confidently adjust cook times for thicker cuts or swap salad pairings based on seasonal produce. Great results stem from respecting each ingredient’s role while embracing creativity.
Now armed with pro techniques, fire up your grill. Whether hosting friends or enjoying a quiet meal, these methods guarantee restaurant-quality taste at home. Your next masterpiece awaits—one perfectly timed flip at a time.
How to Cook a Tomahawk Steak: Juicy & Perfect Every Time!
Pepper Lunch Recipe: How to Make a Delicious and Flavorful Meal at Home
FAQ
What’s the best way to choose a cut for grilling?
Opt for ribeye, strip, or tenderloin. These have enough fat to stay juicy over high heat. Thicker slices (1.5 inches) work best for even cooking.
Can I skip a mortar and pestle for seasoning?
Yes. Use a spice grinder or rolling pin to crush garlic, peppercorns, or chili flakes. Pre-ground spices work, but fresh grinding boosts flavor.
How long should meat marinate before grilling?
Marinate tougher cuts (like flank) for 4–24 hours. For tenderloin or ribeye, 30 minutes to 2 hours suffices. Always refrigerate while marinating.
Why create two heat zones on a grill?
Direct high heat sears the exterior, while indirect heat finishes cooking without burning. This method prevents overcooking thicker cuts.
How do I check doneness without a thermometer?
Use the touch test: press the meat gently. Soft = rare, springy = medium, firm = well-done. Pair this with timing (3–5 minutes per side for medium-rare).
What’s a simple herb butter recipe for steak?
Mix softened butter with minced garlic, parsley, rosemary, and a pinch of salt. Chill for 15 minutes, then melt over rested meat for extra richness.
Which sides pair well with grilled steak?
Try charred asparagus, roasted potatoes, or a tangy salad with lemon dressing. Light, acidic sides balance the meat’s richness.
Can I reuse leftover marinade?
Only if boiled first to kill bacteria. For safety, make extra marinade and set some aside before adding raw meat.